Thanks to the iPhone 6 and #bendgate, every new phone is now subject to dozens of “bend tests” on YouTube. The Nexus 6P was recently the subject of one such bend test, as well as a scratch test and burn test. The whole gauntlet of extreme tests don’t paint a pretty picture for the durability of the Nexus 6P.
Let’s start with the scratch test. The YouTuber used a set of picks that vary on the Mohs Scale of Hardness to scratch the display. The display fared pretty well in this test by scratching right around level 6, which is where you’d expect glass to scratch. However, after the scratch test was done, the display seemed to crack very easily. The back of the Nexus 6P was very easy to scratch with a razor and keys.
The burn test, which was performed by holding a flame directly to the display, left a permanent white spot. We’re not sure why your phone would ever be subject to such intense heat, but apparently it’s a bad thing.
The bend test was the most surprising of the three. He was able to bend the phone almost completely in half with just his bare hands. He says “my little sister could have bent this phone in half,” but it looks to me like he had to put quite a bit of pressure on it, and the display was already cracked. Are you ever going to put that much pressure on the phone? Probably not. The results of these tests don’t look very good, but in the real world the Nexus 6P should be just fine.
Although we were a bit skeptical at first, after receiving the Nexus 6P last week and playing around with it non-stop since then we can conclude, without a shadow of a doubt: the Nexus 6P isn’t just the best Nexus device, it’s arguably the best Android device to come along in years. If you’re a new owner, we probably don’t need to tell you that.
One thing we did want to discuss, whether you just received the Nexus 6P or it’s still coming in the mail, are the first things every owner should do. Although the following guide is more geared to the new or casual Android user (please feel free to share with your non-tech savvy friends/family), we think veterans might find something useful as well. Here are the first 11 things every Nexus 6P owner should do.
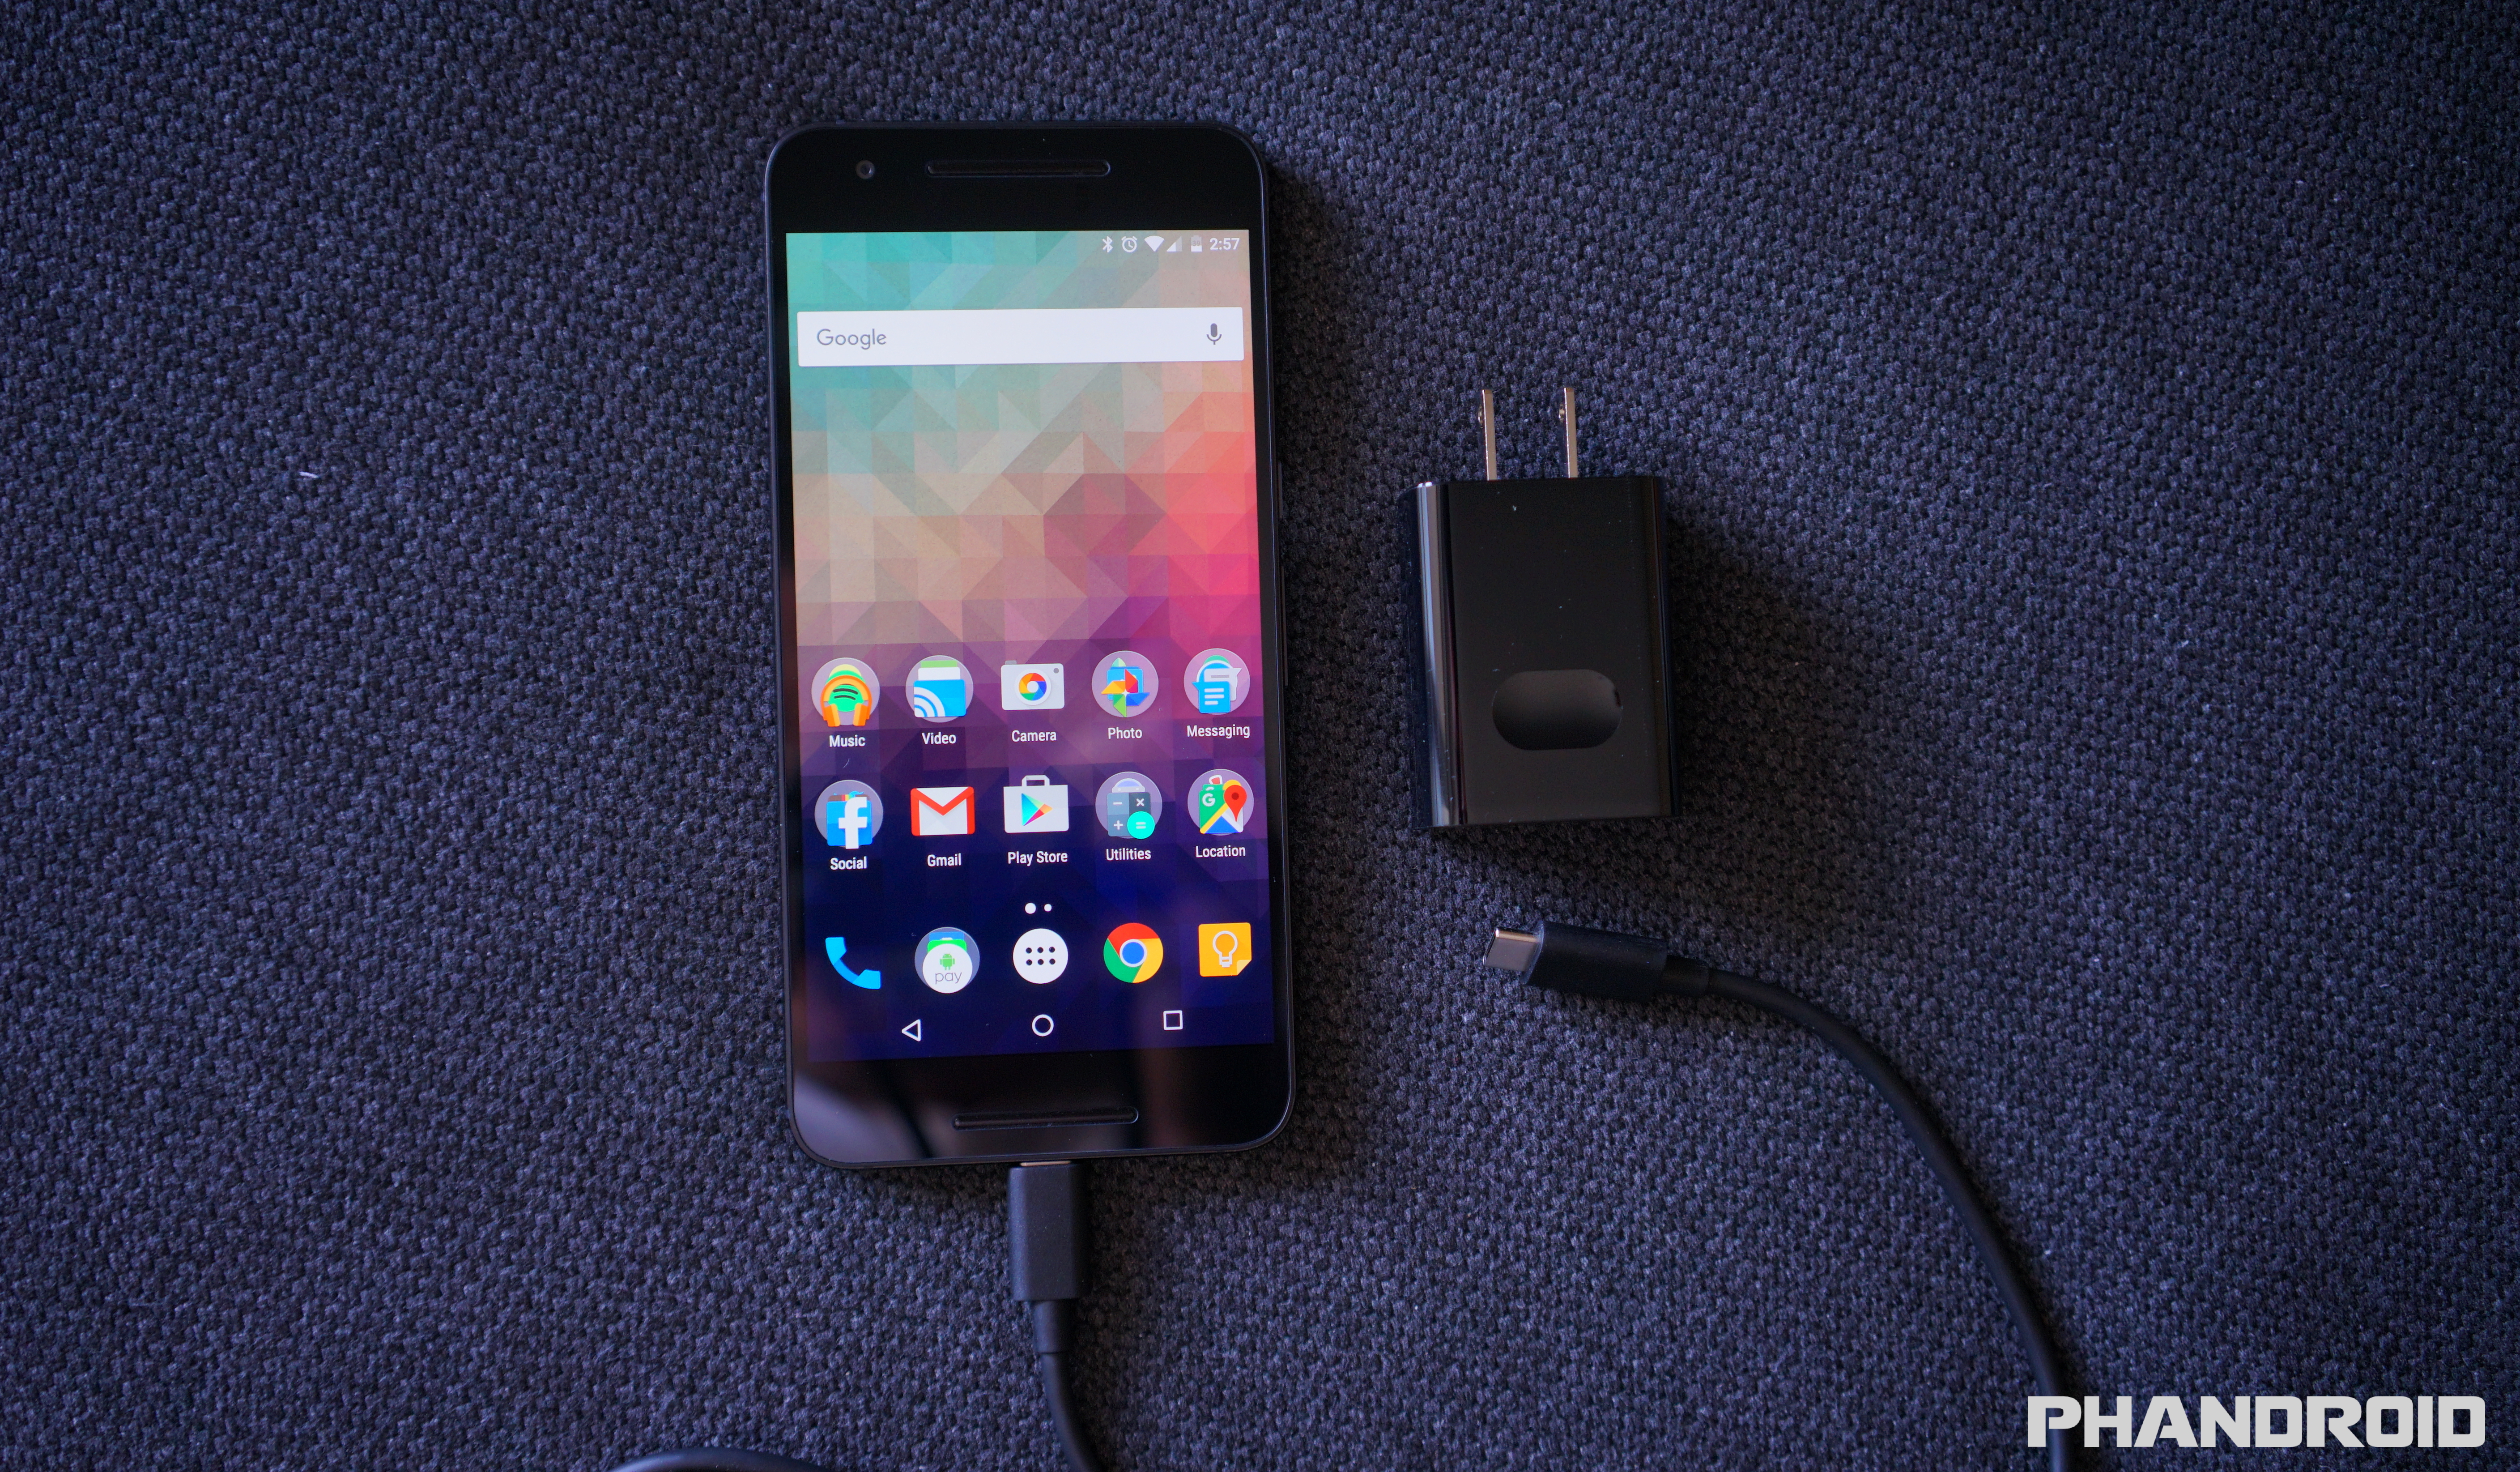
1. Use the included power adapter whenever possible
Although the Nexus 6P doesn’t technically support Qualcomm’s “Quick Charge 2.0,” the 6P does have its own fast charging tech. Google says you can get 7 hours of usage out of a 10 minute charge, but there is a catch: you’re going to have to use the included wall charger, not some rink-a-dink wall charger you found at the 99 Cent Store.
Because of the phone requires a very specific type of charge (5V/3A), finding additional 3rd party options can be kind of tough. Should you be looking for a spare, you can always buy an official Nexus 6P charger from the Google Store — in single or dual-port varieties — although at $25 and $40, respectively, they’re a bit pricey.
Of course, you can always experiment with whatever charger you have laying around and the include 6-inch Type-C to Type A cable (good luck), just know that it probably wont charge as quickly even when the the Nexus 6P lock screen shows that it’s “fast charging.”
2. Sign into your Google account and restore select apps/games
Okay, so this one is pretty much a given. To enjoy just all the free and paid apps/games on the Google Play Store, you’ll need to sign into a Google account. There are a few options Google will give you during the initial setup process, one of which is called Tap & Go. All it does is copy your Google account sign-in info from another (NFC equipped) Android device by pressing the back of them together. It’s neat if you have your old device handy, just make sure it has NFC or it wont do anything. Of course you could always manually type in your sign-in info…
Once you’re all signed in, Google will allow you to choose a previous phone you’d like to copy apps from (either all of them, or just specific apps/games). Depending on the amount of apps you’re restoring, it could take a good 10 minutes, so now would be a good time to make a sandwich. Keep in mind, this wont restore everything, but you should have all your Google contacts moved over followed by the mass re-downloading of all your apps from the Google Play Store. We recommend connecting to WiFi for the quickest results.
3. Secure your phone with fingerprints, pattern, PIN, or password
Our smartphones carry a lot of sensitive information inside, information you probably don’t want ending up in the wrong hands. Should you ever find yourself leaving your phone in a cab, restaurant or even a friends/family place, you’re probably going to want to lock it down with a secure lock screen lest you have someone snooping inside.
The great part about Android is there are a few options available to you — pattern, PIN, and password — and no matter which method you choose, it’s always better than nothing. Because the Nexus 6P also has a fingerprint sensor that can unlock the phone (also known as “Nexus Imprint”) chances are you’ll rarely have to use any of the above methods (as they’re only for backup), but you will be forced to pick one.
If you really want extra security and render your phone useless in the hands of a thief or new owner, you can even have your phone require a PIN before it even boots up. You know, to be on the extrasafe side. Then again, if the phone doesn’t boot, you wont be able to locate it if it gets lost or stolen. Just a thought.
You probably already came across the “Protect your phone” process during the initial setup, but in case you skipped over it, here’s how you can quickly secure your phone later:
1.Go to Settings app > Security. 2.Tap on Nexus Imprint. 3.Choose a secure screen lock from the list (pattern, PIN, or password). 4.Decide whether you want enable “Secure startup” (not recommended for most people). 5.Create a pattern/PIN/password. 6.Decide whether to show full notification content on lock screen, only the app it came from, or nothing at all. 7.Add fingerprints using the Nexus Imprint sensor on the back of the phone. 8.Press the sensor 6 times to record fingerprint data.
That’s it! We recommend adding additional fingerprints using the same index finger twice, but in a slightly different position each time for better accuracy when unlocking using Nexus Imprint. For instance, the first time place your finger flat on the sensor for the first fingerprint. Then, add another using the same finger, but this time use the tip or side of your finger to touch the sensor. This way, no matter how you press your finger on the sensor, you’ll get an accurate reading. Google says recorded fingerprints are encrypted and never leave the actual device, so don’t worry about them being uploaded to the cloud somewhere.
4. Use your fingerprint to make purchases on Google Play
Android isn’t nearly as annoying as iOS is when it comes to downloading free apps. Although you wont be asked for your password when downloading free apps and games, you’ll more than likely reach a point where you actually want to buy something. Entering passwords can be annoying, especially if you have potato fingers like mine. Thankfully, in Android 6.0 Marshmallow, you can now make purchases using Nexus Imprint. You can enable it only 3 easy steps:
1.Open the Google Play app. 2.Slide out the navigation drawer and select Settings. 3.Scroll down and check the box for Fingerprint authentication.
Now, the first time you make a purchase on the Play Store it will still ask for your password, but everything after that can be bought using your fingerprint. You can also skip all that and simply select the option to “Use fingerprint for future purchases” when buying something. Keep in mind that however you enable it, you’ll still have to enter your password the first time, but from here on out, it’s all fingerprints.
5. Use Smart Lock to keep phone unlocked when at home or connected to your smartwatch
Even though Nexus Imprint is more convenient than having to enter a pattern/PIN/password every time you unlock your phone, it can still be a nuisance. For instance, when you have the phone laying on a desk and just want to check on something really quick. Or perhaps you just got home from a long day at the office and don’t want to have to bother using your fingerprint every time you need to check in with your city on Clash of Clans.
Because this is Android we’re talking about here, you have other options as well. Like your phone automatically removing the secure lock screen as soon as you walk through the door of your home. You can even set it so that it’s unlocked when it’s on your person, or say, connected to a Bluetooth device like your smartwatch, wireless speaker, or car stereo. Should you leave the phone in a restaurant, you’ll have the piece of mind of knowing that it automatically locked itself. Neat huh? Here’s where you’ll find it: Settings app > Security > Smart Lock (enter password/PIN/pattern). From there you’ll have a few options:
Trusted devices – keep your phone unlocked when connected to specific devices (speaker, car, smartwatch) via Bluetooth.
Trusted places – keep your phone unlocked when you arrive in specific places (home, work, etc.).
Trusted face – phone will automatically unlock when it recognizes your face after turning the screen on.
Trusted voice – unlock the phone using your voice.
6. Enable developer mode (to speed up animations)
There’s no denying the Nexus 6P is fast. In fact, it’s the fastest Android device we’ve ever laid our hands on. But we can do better. You can actually make the phone feel even zipper by speeding up the transition and UI animations. It’s hidden away inside the Developer options, but here’s how you can find them:
1.Open the Settings app. 2.Scroll down to the bottom and select About phone. 3.Scroll to the bottom and press Build number 7 times (you’ll see a confirmation that you are now a developer), press the back button. 4.Developer options will now appear at the bottom of Settings, select it. 5.Find window animation scale, transition animation scale, animator duration scale and select .5x for each.
7. Enable System UI tuner to add battery percentage
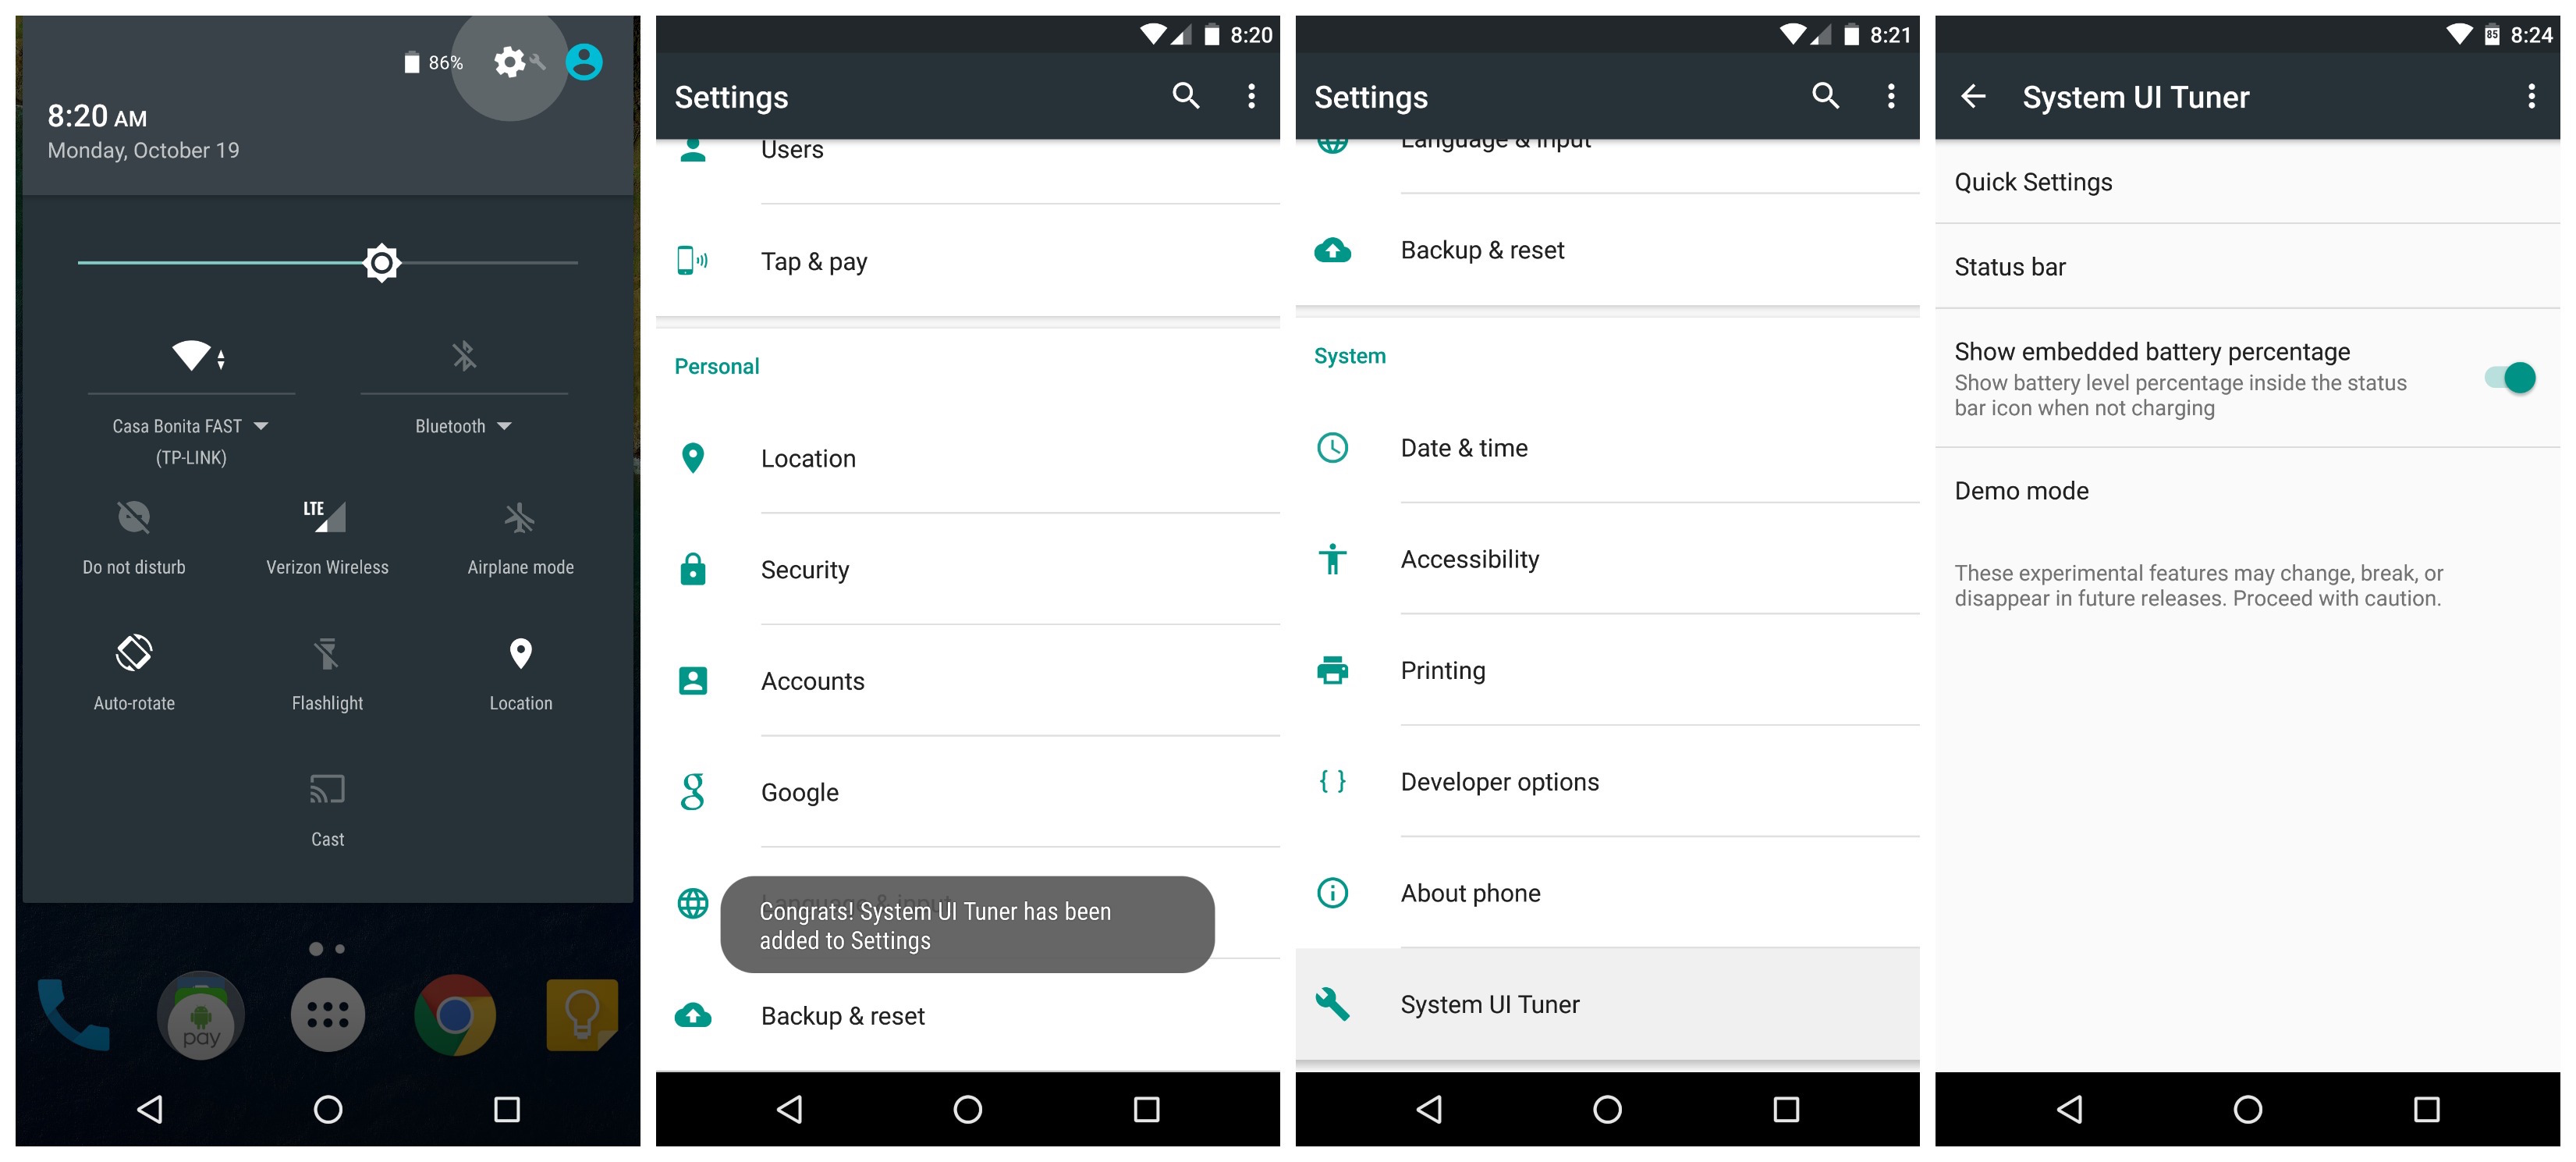
By now you’ve probably noticed how the battery icon in the status bar doesn’t display the actual battery percentage. If you’re looking for a little more detail, tucked away in Android 6.0 Marshmallow is another hidden setting called System UI Tuner. Why it’s hidden, nobody knows, but Google says it’s still “experimental.” Don’t worry, we’re not going to use it for much.
Just pull down the notification tray twice and long press on the little Settings gear icon for about 5+ seconds. It make take more than 1 attempt, but once you let go and pull the shade back up, you should see a new prompt telling you that “Congrats! System UI Tuner has been added to Settings.” Just like those Developer options, you’re going to scroll down to the bottom of the Settings app where you’ll find a new setting called System UI Tuner.
Once inside, Google will warn you about the features being experimental, just select “Got it” and “Show embedded battery percentage. After that, the battery icon in your status bar will show you a battery percentage. Easy peasy.
8. Enable Google Fit
Google Fit is pretty great for tracking general physical activity throughout the day. It’s not as incredibly in-depth as some other services, but the fact that it comes pre-installed on most Android devices and syncs your data to your Google account, you’ll probably want to use it. The only thing you need to do is open the app and enable it.
1.Open the Google Fit app. 2.Sign in with your Google account. 3.Fill out your height, weight, gender, and set a personal fitness goal.
Because the app runs in the background, you wont have to worry about opening it every day or messing around with it too much. Just make sure you keep your phone on you while you’re out and about running errands, or during your run. After that, you’ll receive the occasional notification when you’re getting close to, or have reached, your daily step/activity goal.
9. Setup Android Pay to make purchases using your smartphone
Whether you hate pulling out your wallet and swiping your credit card, or you simply want a backup method of paying for things should you leave your wallet at home, Android Pay makes it easy to make purchases using nothing but your smartphone. Like some of the other things on this list, you’ll first need to open the app and set it all up.
1.Open the Android Pay app on your phone. 2.Touch the + sign in the bottom-right corner. 3.Touch Add a credit or debit card. 4.If you already have linked cards, choose one or touch Add another card. 5.Use the camera to capture your card info or enter it manually.
The toughest part is finding a place that accepts Android Pay, but keep in mind it also works anywhere tap-to-pay or Apple Pay is accepted. Even then, not all card issuers are supported, but you can find a full list of Android Pay supported banks over here. Happy tapping!
10. Check out all the new Marshmallow features
Some of the Nexus 6P’s best features were actually introduced in Android 6.0 Marshmallow. It’s Google’s latest Android release and more than anything it polishes off some of Lollipop’s rough edges, while giving users more control of their apps, better battery life, and improved UI. We covered most of this in our “Everything New in Android Marshmallow” post from back in August, but in case you need a refresher, here’s some of the bigger things you should definitely try out:
1.Google Now on Tap – Scans entire screen to pull up relevant information in a Google Search. 2.Easy word selection and toolbar – Highlight text and a new copy/paste toolbar appears right above it. 3.Simplified volume controls – Adjust ringer/notification volume, media volume (music and videos), and alarm volume by click the drop down arrow. 4.Improved ‘Do Not Disturb’ mode – Choose between total silence (even alarms are muted), alarms only (everything but alarms are muted), and priority only (can be fine tuned to allow specific apps to still ring). 5.Greatly improved battery life while sleeping – With the new “Doze” feature, apps are frozen when the phone hasn’t been touched or moved for long periods of time, increasing standby battery life by days (yes, we said days). 6.App’s ask for permission to access device functions – Apps now ask permission before accessing things like your location, microphone, or camera. You can even fine tune this some more by manually toggling these permissions on the App Info page (Settings > Apps > select app > Permissions).
11. Explore the Nexus 6P forums
The best place for new Nexus 6P owners to mingle is on Android Forums. It’s where you’ll find all sorts of help, tips, tricks, support, suggestions, and information about your phone than shiny new smartphone. You’ll also find plenty of other users sharing their own personal experiences, favorite accessories, and whatever else pops into their head. Here are a few of the more popular threads to get you started:
On paper, the Huawei Nexus 6P may not sound like such a huge leap over last year’s Motorola-made Nexus 6. Which would have been fine if the phone didn’t come with such a high price tag. Unlike the last year’s Nexus 6, you wont be able to get the Nexus 6P through your carrier, meaning you’ll have to dish out all the money upfront in order to get it direct from Google. At $500 for the 32GB model and jumping $50 for every storage size increase, it simply wasn’t the reasonably priced flagship device we were expecting from Huawei, especially considering the hardware. Snapdragon 810? Here we go…
We’d be lying if we said we weren’t expecting the worst out of the included Snapdragon 810, especially after experiencing other devices using the same processor ( HTC One M9, OnePlus 2) which heated up quickly, and generally weren’t as snappy as other devices (this had to do with OEMs throttling down the CPU to keep temperatures low). We’re not sure what they did, but Google’s elves were somehow able to tap the 810 to its full potential, all the while keeping heat down. Sure it gets a little warm when doing a hundred things at once and/or snapping pics, but it cools just as quickly. And the speed. Oh, man. We could go on and on about the speed. We don’t care what you read in X benchmark — It’s by far the fastest Android device we’ve ever experienced. Hands. Down. AMOLED without all the suck
Another area we weren’t too thrilled about initially was the AMOLED display. Typically AMOLED tends to be a tad on the over saturated side, with yellow whites and terrible outdoor viewing. After our Nexus 6 — which also uses a Samsung AMOLED panel — experienced screen burn-in after only 5 months of use, needless to say we weren’t too excited when we heard Google would also be using AMOLED in this year’s Nexus 6P.
What we later learned is Google and Huawei paid top dollar to use the latest Samsung AMOLED panels in the Nexus 6P, not the previous year’s scraps. Although they didn’t say which current Samsung devices employed the use of the same display, the 5.7-inch size leads us to believe it could be the one found in the Galaxy Note 5, although Google wasn’t able to confirm this. This means the whites are white (a little on the cool side, colors are saturated, blacks are super dark, and you shouldn’t have to worry anymore about burn-in. We would have loved to see a robust display mode picker like on the Samsung devices where you can choose varying levels of saturation or color temp according to personal tastes, but I suppose you can’t have it all. Edit: There is a low-saturation sRGB picture color mode tucked away in the Developer options. (Thanks, DNagooyen!) All we can say is “Wow”
In our brief time with the device (48+ hours), we walked away incredibly impressed with the Nexus 6P. And that’s saying something given we were looking for any reason to hate on the phone and keep from upgrading our Nexus 6 from last year. The new “Nexus Imprint” fingerprint scanner was lightning quick and accurate, battery life has been great so far (still need more time to give you accurate charge/discharge averages), and the speakers are crystal clear.
We really couldn’t find a single area where the Nexus 6P fell flat. Sure, OIS or the usual micro SD card expansion/removable battery would have been nice, but the phone excels in every other area that you likely wont even miss it. Again, we’ve only spent a few days with the Nexus 6P and already it’s not only the best Nexus device to date, but the best Android device we’ve ever laid hands on. Huawei, Google — you guys knocked this one out of the park.
Nexus 5X
With the Nexus 5X being the successor to 2013’s phenomenal — and reasonably sized Nexus 5 — the 5X has some pretty big shoes to fill. Like many of you, we were hoping for that same beloved form factor (or at least something close to it), only with substantially upgraded hardware. Unfortunately, while there are some improvements, the 5X follows the trend of most other smaller-sized devices on the market today. That means the 5X is Google’s smaller, more affordable Nexus offering for 2015 and with that comes lighter hardware as well. Bummer. Ho-hum hardware
That’s not to say the Nexus 5X is bad by any means. It just didn’t blow us away. The 1080p LCD display gets the job done, but it’s nearly identical to the one found on the 2013 model. Storage and RAM is also the same, coming in at 16/32GB and 2GB, respectively. Remember that terrible bottom facing speaker on the 5 2013? It’s been replaced with a slightly less awful single front facing one (more clarity, but still low on volume output), so that’s nice. 2015 improvements
It’s no all mediocre. Google and LG were able to improve that awful Nexus 5 camera with a much improved 12.3MP rear, 5MP front facing camera. In fact, it’s the same rear camera as the one found on the Nexus 6P, meaning photo quality should be equally as good. The new “Nexus Imprint” fingerprint sensor on the back is also a nice upgrade with quick recognition and great accuracy. There’s also a larger 2,700mAh batter which should have little trouble taking you to the end of your day with moderate to light usage. Still too expensive for what it offers
All of this combined with a snappy Snapdragon 808 processor (the same one as found on the LG G4 and Motorola Moto X Pure Edition) and you have a Nexus that delivers in the 5 key areas consumers look to most: somewhat affordable pricing, great camera, fast performance, good battery life, and constant software updates directly from Google. We just wish it priced a little more aggressively considering the hardware/build quality isn’t much better than most other 2015 flagships. Save your $400 and grab a Moto X Pure Edition instead.
Nexus 5X unboxing confirms it does not ship with USB Type-C to Type-A cable Many of you have yet to receive a Nexus 5X or Nexus 6P, but some lucky souls in India walked away with units at Google’s launch event for the devices in the region today. Wondering how things look when you finally get to take it out of the box?
Wonder no more. Unboxing videos are starting to hit the web. There’s nothing out of the ordinary that we don’t expect from past unboxing experiences. There’s nothing flashy going on, though we do give Google a good deal of applause for keeping things nice and neat.
The boxes contain your standard assortment of quick start guides and warranty information, though you should also find an insert for a Google Play Music trial in there, as well. There’s also the USB Type-C charging puck and a Type-C to Type-C cable in both.
One thing worth noting is that that the Nexus 6P does ship with a USB Type-C to USB Type-A cable, but the Nexus 5X does not. We’d heard this would be the case as per Google’s listing on the Google Store, but many held out hope that this was simply an error on Google’s part. Sad to say it’s not an error, which explains why it hasn’t been fixed despite our inquiries into Google.
Looks like you’ll have to order a cable for your Nexus 5X (Amazon has a great variety of cables right here) if you’re in need. As for those unboxings, the videos are above, so be sure to check them out at your earliest convenience!
While updating a Nexus phone to Android 6.0 Marshmallow on Windows and Linux are trivial matters, things are a bit different for those who dwell in the land of the Macs. Thankfully there’s some help out there that should get you well on your way. The video you see below was originally made for the Nexus 5’s Android 5.1.1 Lollipop, but thankfully it still fully applies to installing Android 6.0 Marshmallow on any modern Nexus device.
Otherwise, an attention to detail and the ability to sit through a 3 minute video are all you need to get yourself educated on what to do. Give it a go, but be careful. And remember, if you aren’t comfortable with manually flashing updates then there’s nothing wrong with waiting for it to hit your device naturally.
The time is here! Google has just posted the Android 6.0 Marshmallow factory images for a slew of Nexus devices. The list of devices include the Nexus 6, Nexus 5, Nexus 9, Nexus 7 (2013), and Nexus Player. Head on over to developer website to download the files for your device now!
Google will be rolling out an OTA update soon, but if you don’t want to wait for that you can flash the factory image. The process is relatively simple if you’ve never done it before.
What will you get with Android 6.0? A bunch of things. We went hands-on with the first couple of Android Marshmallow builds below.
It’s nearly impossible to design a tech product that won’t generate some reason for complaints from some cross-section of consumers. Make the world’s thinnest device and people complain about specs. Make the most powerful device on the planet with amazing battery life and people complain its too bulky. Everything is a balance, but one particular omission from the newly announced Nexus 6P and Nexus 5X are drawing a lot of complaints: there is no Wireless Charging.
Now we know why Google didn’t include Qi Wireless charging in these new devices: We added Qi wireless charging starting with N4 because plugging in USB micro B was such a hassle! (Which way is up!?) With this year’s Nexii, we support USB Type-C which has a reversible connector so there’s no more guessing. AND it charges incredibly swiftly: 1% to 100% in 97 mins on the 6P for example (the first ~45 mins of charging is especially fast). Meanwhile, wireless charging adds z (thickness). So, ease of plugging in + fast charging + optimizing for thinness made us double down on Type-C instead of wireless!
We won’t agree or disagree with the question, because it all comes down to personal preference, and that’s part of Android’s beauty- if you don’t like it there are dozens of other amazing Android phones from which to choose. We will say, however, that we hope the next generation of wireless charging comes soon.
Google has made it all official, folks: this is the Nexus 6P by Huawei. There aren’t many surprises by now, but it’s nice to get an official rundown of everything this phone has to offer. It’s a 5.7-inch AMOLED display surrounded by a ton of metal and backed by a lot of processing power. Here is the full spec sheet for your consideration: Screen: 5.7”, 518 PPI, WQHD AMOLED Camera: 12.3MP Rear / 8MP Front (1.55 μM, F2.0 / 1.4 μM FF) Processor: Qualcomm® Snapdragon™ 810 v2.1 processor Battery: 3,450 mAh (Built-in) Dimensions: 159.4 x 77.8 x 7.3 Weight: 178g RAM: 3 GB (LPDDR4) Storage: Comes in 32/64/128 GB
You’ll notice there’s no wireless charging or microSD slot, but there’s plenty more to like here. The device features Nexus Imprint, which is a fancy name for that fingerprint scanner you see on the back. It can be used to authorize purchases from Google Play or in financial apps, as well as the ability to authorize Android Pay purchases.
The device also works with the new “Android Sensor Hub,” a low power mode which is always working to deliver context-sensitive functions. For instance, tapping the fingerprint scanner will bring the device from sleep to wake in no time — it’s nearly instantaneous. It also powers the ambient display mode, which — coupled with an awesome AMOLED display technology — makes it easy to jump in and out of notifications even while the display is powered off.
The Nexus 6P will obviously ship with Android 6.0 Marshmallow and all the features which come with that goodness (including Google Now on Tap). Google also confirmed that it’s fully compatible with all major US carriers, as well as most carriers in Canada and around Europe. Oh, and there’s Proect Fi support — can’t forget that. You can order one from the Google Store right now starting at $499 in Aluminium, Graphite, or Frost color options.
A training presentation that’s intended for US retailers, reviewers, and presenters has leaked in full glory, revealing nearly everything about the Nexus 6P besides pricing and availability. If you can’t wait until Tuesday, September 29th, this slideshow is for you. Enjoy.
Also, don’t forget to check out the speaker notes for even more Nexus 6P goodies and marketing buzz on the features, design, Nexus Camera details, fingerprint sensor, and more. Here’s an updated Nexus 6P spec list.
Nexus 6P specs Screen: 5.7”, 518 PPI, WQHD AMOLED Camera: 12.3MP Rear / 8MP Front (1.55 μM, F2.0 / 1.4 μM FF) – Final resolution of the images may be less than 12.3MP Processor: Qualcomm® Snapdragon™ 810 v2.1 processor Battery: 3,450 mAh (Built-in) Dimensions: 159.4 x 77.8 x 7.3 Weight: 178g RAM: 3 GB (LPDDR4) Storage: Comes in 32/64/128 GB